Bumping a heavy piece of equipment into a cherished piece of wood furniture and gouging a deep scratch, noticing your car’s dashboard or a power tool housing faded and chalky from sun exposure, or watching your leather upholstery begin to crack are incredibly frustrating moments in any home maintenance routine. Over time, natural wear and tear combined with minor accidents seem to sentence our belongings to the junkyard or to overpriced professional refinishing shops. However, modern chemical engineering has brought high-performance solutions to the automotive and residential markets that bring different materials back to their original aesthetic glory without requiring brutal physical labor or advanced artisan skills. If you want to save thousands of dollars reconditioning your items by yourself, this practical guide will map out exactly How to Restore Damaged Surfaces: Prime Day Restoration Deals.
Disclaimer: As an Amazon Associate, FixByMyself earns from qualifying purchases made through links in this post at no additional cost to you.
Toss or Restore? The Power of Modern Compounds
The biggest mistake in household property care is adopting a throwaway culture at the very first sign of aesthetic damage. The DIY (Do-It-Yourself) mindset backed by modern polymers, acrylic fillers, and deep conditioners proves that the vast majority of surfaces written off as lost causes can actually gain a brand-new lease on life.
Today’s restoration compounds don’t just camouflage a problem under a superficial, greasy layer of shine. They work by actively penetrating the structural grooves of the material, filling physical voids, restoring lost flexibility, and establishing highly durable molecular barriers against moisture and ultraviolet rays. Learning how to deploy these products on your workbench demystifies the repair process and drastically lowers the long-term preservation costs of your property.
Top Wood and Plastic Solutions on Sale This Prime Day
Wood and plastic are the surfaces that bear the brunt of physical impacts and environmental degradation. Fortunately, treatment kits for these specific materials are among the most budget-saving offers during major shopping events.
1. Hard Wax Kits and Wood Fillers for Deep Gouges
Deep scratches on dining tables, door jambs, or laminate flooring won’t vanish with standard liquid polishes. To fix them properly, professional-grade hot-melt hard wax kits or water-based acrylic fillers are highly recommended. These systems fill the wood void completely, accept subsequent sanding for a perfectly flush level, and are available in multi-shade mixable palettes to perfectly replicate the original grain and hue of woods like mahogany, walnut, or pine.
👉 Check Wood Restoration Kit Prime Day Prices on Amazon
2. Deep-Penetrating Plastic Restorers and Revitalizers
The plastic casings of vintage power tools and exterior automotive trim components tend to lose the essential oils within their chemical makeup due to sun exposure, resulting in a chalky, gray, and brittle appearance. Professional restorers soak deep into the pores of the polymer, reinstating the original dark pigmentation and leaving behind a protective barrier that is dry to the touch, repels water, and prevents shop dust from clinging to the item during work.
👉 View Premium Plastic Restorer Discounts on Amazon
Leather Restoration and Treatment for Tarnished Metals
Upholstery, car seats, and metallic surfaces demand highly specific compounds that either maintain material pliability or offer chemical polishing without severe micro-abrasion.
3. Leather and Vinyl Repair Compounds (Flexible Fillers)
Cracks in office chairs or tears in genuine and synthetic leather upholstery can be easily halted using cold-cure flexible compounds. These chemical fillers bond seamlessly to the fibers of the substrate, filling the tear while retaining the necessary elasticity to support body weight and daily shifting without cracking or peeling away after drying.
👉 Snag Leather Repair Kits with Free Prime Shipping Here
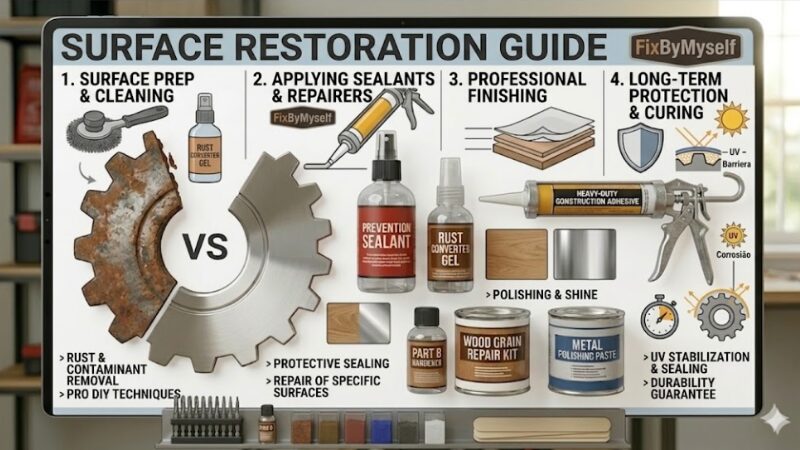
The Restorer’s Blueprint: Securing an Invisible Finish
Achieving a flawless, professional-grade home restoration relies completely on respecting chemical cure times and performing rigorous surface prep. Throwing a filler compound onto a dirty surface or trying to rush the job by applying thick single layers will completely ruin the final look.
To ensure your repair blend disappears entirely into the original surface, follow this technical reference chart:
| Damaged Material | Common Damage Type | Precise Chemical Compound | Critical Finishing Step |
| Wood / Laminates | Deep Scratches & Chips | Hard Wax or Acrylic Wood Filler | Level completely using 400-grit sandpaper |
| Plastics / Polymers | Sun-Fading & Oxidation | Deep-Penetrating Restorer | Buff thoroughly with a clean microfiber towel |
| Leather / Vinyl | Cracking & Small Tears | Flexible Adhesive Compound | Lightly texture the surface before it fully cures |
| Metals (Steel / Brass) | Oxidation Spots & Dullness | Chemical Polishing Paste | Apply firm, consistent circular buffing motions |
Critical Mistakes That Destroy Surface Restoration Projects
A very common mistake that ruins the appearance of plastic trim during the revitalization process is failing to perform a thorough preliminary cleaning. Applying trim restorers or conditioners over surfaces holding fine sanding dust or everyday road grime creates an abrasive sludge. This mixture, besides scratching the healthy underlying plastic, blocks the polymer from properly absorbing the restorer, causing the factory-fresh look to wash away during the very next rain or car wash.
Another perilous workshop oversight is mismatching the shade of your wood filler by skipping a preliminary spot test. Because wood fillers and hard waxes can shift slightly in color once they fully cure or after they receive a protective topcoat of clear varnish, never apply the compound directly to the center of the visible damage first. Always mix and test a small amount on a hidden area of the item (like underneath a table lip or the back of a leg) to certify that the final cured color will blend seamlessly into the piece.
Technical Verdict
Specialized cosmetic kits, home restoration compounds, and surface maintenance products see massive demand spikes during major Amazon promotional windows. Because automotive detailing shops, furniture refinishing studios, and professional woodshops leverage these seasonal price drops to lower their annual operating costs by buying bulk gallons and imported supplies, promotional inventory blocks from leading brands vanish quickly. Take inventory of the worn-out furniture, faded plastics, and blemished tools around your shop, organize your list of necessary chemical compounds, and secure your repair kits while free shipping tiers and special coupons are live.
Do you have an antique piece of furniture with a deep scratch that’s driving you crazy, or a faded dashboard you are trying to save in the garage? Drop a comment down below describing the specific damage, and I will help you analyze the technical specs to pick the perfect restoration compound for your project!